Liberty Cabinet AN0251C-CL-U Knob/Pull Hardware Installation Template Guide

Brand:Liberty

3.6/5

28.30

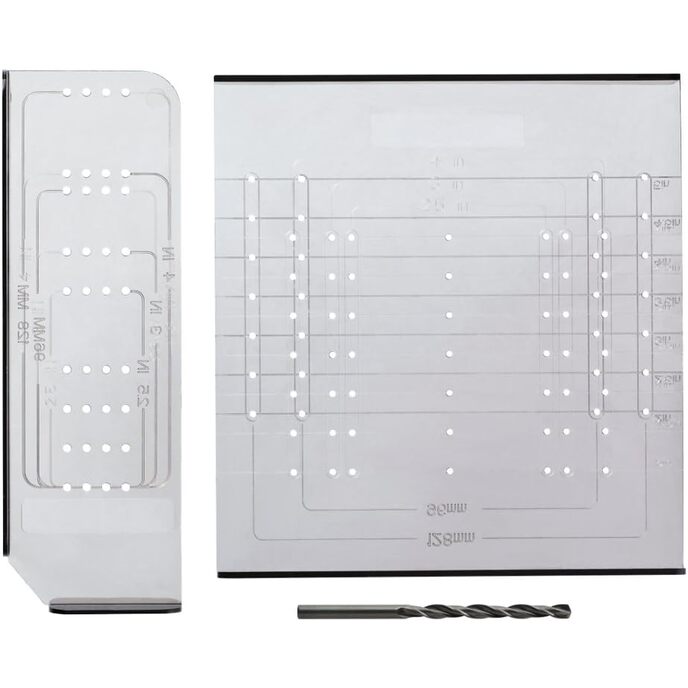
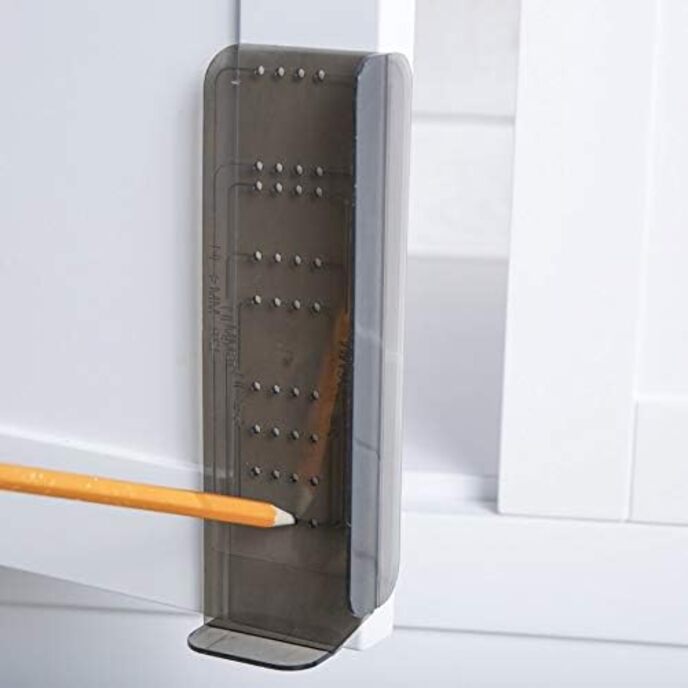
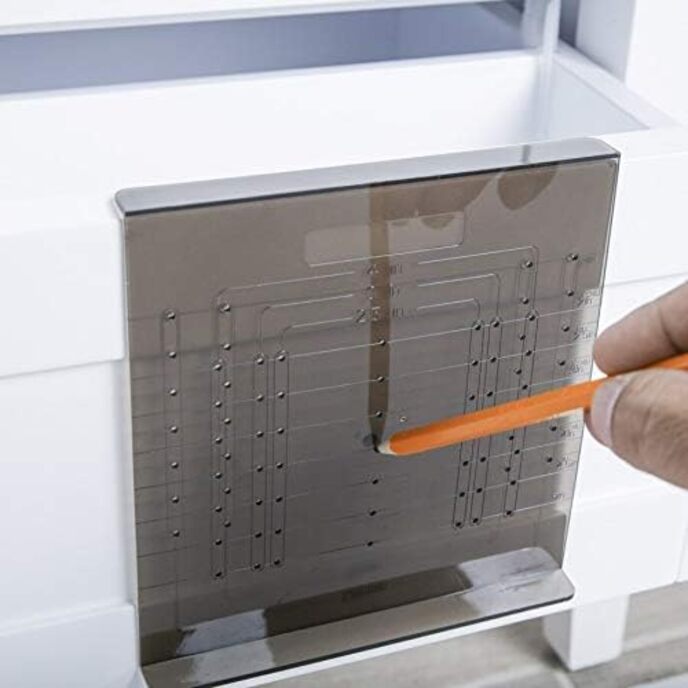
Markeer het, boor het en monteer het met de AlignRight Cabinet Hardware Mounting Kit van Liberty. Deze kit bevat zowel deur- als lademontagesjablonen, waardoor het ideaal is voor volledige keuken- of ijdelheidsinstallaties. Duidelijk gemarkeerde veelvoorkomende plaatsingen van gaten maken de installatie van knop en trek een fluitje van een cent doordat u elke keer precies de juiste montagegaten kunt markeren.

Geen eenheden beschikbaar

EAN: 354123930738

Categorieën Tools & Home Improvement, Hardware, Kastbeslag, Pulls,

Sjabloon zorgt voor eenvoudige installatie van pulls tot een maximale hart op hart meting van 5-1/16 inch. Bevat een standaardboor van 5 mm (3/16 inch) voor montagegaten van de juiste maat. Ontworpen voor gebruik met elke knop en voor gangbare trekmaten tot 5-1/16 inch (128 millimeter) hart op hart. Duidelijke rokerige afwerking stelt gebruikers in staat om door de sjabloon te kijken voor verbeterde bruikbaarheid. Stapsgewijze visuele instructies op de achterkant van de verpakking. Gemaakt van duurzaam kunststof met gegoten meetlijnen.
Batteries Included? ‎No
Batteries Required? ‎No
Color ‎Clear
Country of Origin ‎USA
Customer Reviews 4.5 4.5 out of 5 stars 3,171 ratings 4.5 out of 5 stars
Finish ‎Polished
Included Components
Is Discontinued By Manufacturer ‎No
Item model number ‎AN0251C-CL-U
Item Package Quantity ‎1
Item Weight ‎3.2 ounces
Manufacturer ‎Liberty Hardware Manufacturing Corporation
Material ‎Plastic
Part Number ‎AN0251C-CL-U
Size ‎For Pulls Up To 5” in Length
Style ‎Utility
Usage ‎Cabinets

3.6

13 Review
5 Star
75
4 Star
13
3 Star
6
2 Star
2
1 Star
4

Schrijf je beoordeling

Uw e-mail wordt niet gepubliceerd. Alle verplichte velden zijn gemarkeerd met*

Scritto da: Larry
Good
It is thick and good quality
Scritto da: JayDee
Take the time to encircle the template openings in use with marker pen.
What a time saver! At first, I thought about building my own template to drill holes in cabinet doors and drawers for a total of 60 pulls (120 holes). After on-line research I discovered this template guide. It's the best value packed purchase I've ever made on Amazon. Don't hesitate to purchase this problem solver. And, don't forget to encircle the drill holes you are using with a maker pen to avoid mistakes.
Scritto da: Ginger McNeely
Color isn't great for the job
The quality is fine and it does its job, but the color of the plastic is very hard to see through. It is not clear as pictured... it is more "pencil lead gray" and very difficult to see your markings through. I had to use a bright task light to be able to see what I needed to see.
Scritto da: kfr
Low cost and easy to use
I would recommend for most knob or pull installations. Check to make sure this template is designed for your size pulls. My templates were slightly warped but still worked fine. May not work for all installations for your exact placement for your install. If you need more flexibility for placement you should get an adjustable template instead. I held the template in place with a clamp and marked lightly with a center punch, That worked better than pencil or fine tip marker because it left a small indention that helped keep drill bit centered in place as you started drilling the hole. Learned that lesson on one hole where the drill bit walked slightly before hole began. Hint: once you determine what holes to use on template, place a piece of masking tape over correct hole/holes and use something to punch out holes. That helps make sure you use the same holes on the template for all drawers or cabinets of the same size and knob/pull placement. Repeat for other sizes and placements.
Scritto da: N. Santos
Time Saving, Perfect Alignment everytime.
You should get an alignment kit prior to installing cabinet hardware, this will save a lot of time. That is the first advice you are going to find on all youtube videos from the pros. This kit worked perfectly for me with these handles: 12mm Stainless Steel Kitchen Cabinet Handles T Bar Pull (6" Overall Length,3.8" Hole Centers). The horizontal drawers required more steps, these were my steps: 1) The drawers had a center hole on the inside. Used the skinniest drill bit to make a little hole marking the center hole on the wood plating, not all the way through just enough to mark it, if you have a long skinny marker you can use that. 2) Unscrewed the wood plating of the drawer. 3) Using the aligning template, centered and I marked the holes for the screws on the back of the wood plating. 4) Using the skinny drill, drilled the screw holes all the way through from the back to the front, should not crack around the hole since is so skinny. 5) Changed the drill to the screw size one and drilled front to back using the small holes as guides. 6) Using a very large bit very slowly start enlarging hole from the back. Measure by putting the screw in the hole until the screw is flushed with the back. 7) Install the handle to the wood plate. 8) Screw the wood plate back onto the drawer.
Scritto da: J7891R
Great for the sizes it accommodates..
Of course it doesn’t handle every size or configuration but with a little measuring, you can do any layout you’d like in a breeze; significantly reducing install time! Great product for a DIY job or anyone who needs it daily.
Scritto da: Fatima Lyons
Great tool
I felt like a professional when using this to tool to put the handles on in my kitchen and bathroom
Scritto da: CGG
Exactly what I needed
I didn't really use the assigned holes because they didn't line up with my doors. The drawer one worked great you just have to measure center on each drawer then liNE the center hole with that mark and select which height you want hit the marks with an awl, drill the holess and mount your hardware. Made short work of my entire kitchen and everything turned out perfect. I marked which holes I was using with a red sharpie so I didn't get confused and make a mistake since there are so many holes on the product it's easy to get confused. The door one I measured and drilled the first one without the product. Once I knew that one was perfect and had a hole I placed the product on the door and drilled a hole through the back of the door (where I had already drilled) and went straight through the product, thus making a new hole exactly where I needed one. Then I used that mark to mark the rest of the doors. Worked great. I was going to make my own templates out of wood which would have given me the same result, but this took less effort. Great product if you know what you're doing. If you don't = check all your marks a couple times before drilling, and you might want to mark with a pencil instead of an awl in case you're off a bit. Good luck!
Scritto da: David
Works well
Easily helped me instal all my handles accurately.
Scritto da: Theresa
Baffling
This was a bit baffling but maybe it was just me, it was never used.
Scritto da: Fred Deneault
Must have!
I bought this to install handles on new cabinet doirs and drawers. It did a perfect job. Measurements are super easy to read It is simple to manipulate and to keep in place while drilling holes It is made from a quality plastic It can be easily used for both doors and drawers. Highly recommended product!
Scritto da: MG
Simple but works
Worked well for all handle installs at a reasonable cost.
Scritto da: Adil
Works well, if you do the following
This guide is only for marking, at least for the size of screws we used to attach out handles. It is best to apply a line of tape over holes vertical or horizontal and puncture a hole that you will use so you do not accidentally mark the wrong spot. It also helps to have a measuring tape and small level on hand when required. Otherwise a simple product to use!

Gerelateerde producten

hot
Amerock
3.9/5

€ 27.59

Amerock
3.9/5

€ 27.59

hot
Amerock
3.7/5

€ 44.62

Amerock
3.7/5

€ 44.62

Ontdek ons ​​internationale netwerk

We verzenden naar 28 landen, meer dan 200.000 producten. Blijf op de hoogte, schrijf je in voor de nieuwsbrief.

Array